|
AndyBoard Install Arduino IDE 1.8.9
|
The following steps will download and install Arduino IDE release 1.8.9.
This is an older version of the IDE, but it is the correct one to use in this class.
Step 1:
Click here to download the Arduino IDE 1.8.9 installer.
The Arduino IDE installer - its name is arduino-1.8.9-windows.exe but it is zipped into a file called "arduino-1.8.9-windows.zip" for downloading -
should, after a few seconds, be in you computer's Downloads folder.
Step 2:
Open Windows File Explorer - not Internet Explorer - it will have an icon similar to this:
 and go to the Downloads folder.
The Arduino IDE installer - its name is "arduino-1.8.9-windows.exe" but is zipped into a file called "arduino-1.8.9-windows.zip" for downloading -
should now be in you computer's Downloads folder.
Step 3:
In File Explorer double click on "arduino-1.8.9-windows.zip". File Explorer will display a file named "arduino-1.8.9-windows.exe". Double click on it.
This will open the Arduino IDE installer.
If a User Account Control security popup appears, click on YES.
Step 4:
When the Arduino Setup: License Agreement popup appears, click on I Agree.
Step 5:
When the Arduino Setup: Installation Options popup appears, click on NEXT.
Do not make any changes to the item selections.
Step 6:
When the Arduino Setup: Installation Folder popup appears, click on INSTALL.
Do not make any changes to the Destination Folder name.
The installation process will then begin and will take a minute or so.
Step 7:
When the Windows Security popup appears asking if you would like to install this device software, look at the box with a check mark in it.
The check mark means that you trust Adafruit Industries.
Adafruit is a good company and can be trusted, but you can uncheck this box if you are not comfortable trusting them.
Click on INSTALL
Step 8:
If you get more Windows Security popups, asking if you would like to install this device software, click INSTALL
You can uncheck the TRUST box if you want to.
Step 9:
When the Arduino Setup: Completed popup appears, click on CLOSE.
The installation process is now complete and an icon similar to this:
and go to the Downloads folder.
The Arduino IDE installer - its name is "arduino-1.8.9-windows.exe" but is zipped into a file called "arduino-1.8.9-windows.zip" for downloading -
should now be in you computer's Downloads folder.
Step 3:
In File Explorer double click on "arduino-1.8.9-windows.zip". File Explorer will display a file named "arduino-1.8.9-windows.exe". Double click on it.
This will open the Arduino IDE installer.
If a User Account Control security popup appears, click on YES.
Step 4:
When the Arduino Setup: License Agreement popup appears, click on I Agree.
Step 5:
When the Arduino Setup: Installation Options popup appears, click on NEXT.
Do not make any changes to the item selections.
Step 6:
When the Arduino Setup: Installation Folder popup appears, click on INSTALL.
Do not make any changes to the Destination Folder name.
The installation process will then begin and will take a minute or so.
Step 7:
When the Windows Security popup appears asking if you would like to install this device software, look at the box with a check mark in it.
The check mark means that you trust Adafruit Industries.
Adafruit is a good company and can be trusted, but you can uncheck this box if you are not comfortable trusting them.
Click on INSTALL
Step 8:
If you get more Windows Security popups, asking if you would like to install this device software, click INSTALL
You can uncheck the TRUST box if you want to.
Step 9:
When the Arduino Setup: Completed popup appears, click on CLOSE.
The installation process is now complete and an icon similar to this:
 will have been added to the desktop.
The Arduino IDE must now be configured.
Step 10:
Double click on the Arduino IDE icon
If a Windows Security popup appears saying the Windows Defender Firewall has blocked some features of this app, click on the box to the left of
Private networks to make a check mark appear and click on the box to the left of Public Networks to make the check mark go away,
and then click on ALLOW ACCSESS.
The IDE working window will appear.
Do not make any changes to this window at this time.
Step 11:
Click on FILE and then click on PREFERENCES in the pull down menu.
A window similar to this:
will have been added to the desktop.
The Arduino IDE must now be configured.
Step 10:
Double click on the Arduino IDE icon
If a Windows Security popup appears saying the Windows Defender Firewall has blocked some features of this app, click on the box to the left of
Private networks to make a check mark appear and click on the box to the left of Public Networks to make the check mark go away,
and then click on ALLOW ACCSESS.
The IDE working window will appear.
Do not make any changes to this window at this time.
Step 11:
Click on FILE and then click on PREFERENCES in the pull down menu.
A window similar to this:
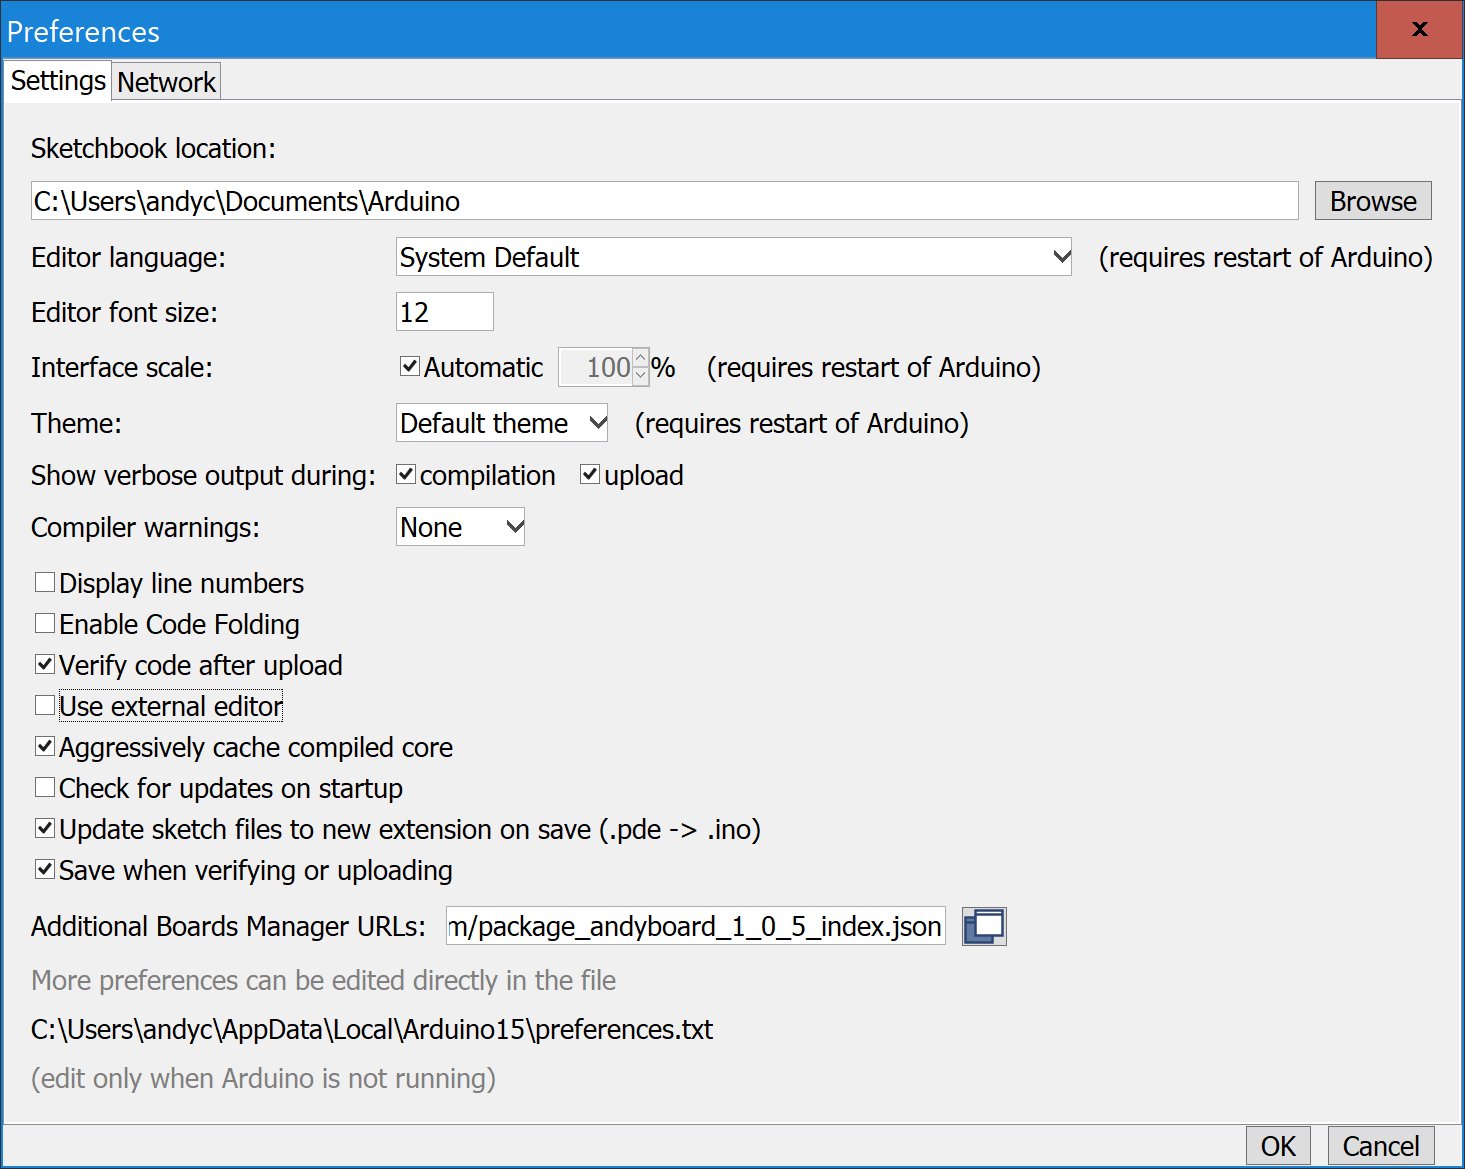 will appear.
The following changes must be made to the preferences:
Click to enter a check mark in the box to the left of "compilation".
Click to enter a check mark in the box to the left of "upload".
Click to remove the check mark from the box to left of "Check for updates on startup"
Enter the following in the "Additional Boards Manager URLs:" box: https://www.andyboard.com/package_andyboard_1_0_5_index.json
Then click OK.
will appear.
The following changes must be made to the preferences:
Click to enter a check mark in the box to the left of "compilation".
Click to enter a check mark in the box to the left of "upload".
Click to remove the check mark from the box to left of "Check for updates on startup"
Enter the following in the "Additional Boards Manager URLs:" box: https://www.andyboard.com/package_andyboard_1_0_5_index.json
Then click OK.
updated 14jul24 AC